Build Your Own Garden Koi Pond – Ideas and Tips

Transforming your outdoor space into a tranquil retreat can be achieved by creating a garden koi pond. This rewarding project not only enhances the aesthetic appeal of your garden but also provides a soothing water feature that attracts beautiful ornamental fish.
Understanding the nuances between a standard pond and a specialised koi pond is crucial for success. A koi pond requires careful planning, including proper depth, effective filtration systems, and meticulous water quality management to ensure the health and well-being of your koi.
This comprehensive guide will walk you through every stage of developing your garden koi pond, from initial planning to introducing your first koi. By following this guide, you’ll be able to avoid common pitfalls and create a thriving environment for your fish.
Inhaltsverzeichnis
Key Takeaways
- Understand the differences between a standard pond and a koi pond.
- Plan carefully, considering depth, filtration, and water quality.
- Learn how to manage water quality to keep your koi healthy.
- Avoid common mistakes in koi pond construction.
- Discover the steps to introduce your first koi successfully.
Understanding Koi Ponds: Basics and Misconceptions
Before you start building your koi pond, it’s essential to grasp the fundamentals and dispel common misconceptions. A well-designed koi pond is not just a beautiful addition to your garden, but also a thriving ecosystem for your fish.
What Makes a Koi Pond Different
Koi ponds differ significantly from regular garden ponds in their design requirements. A minimum depth of 4 feet is recommended to prevent freezing in winter and to provide enough space for your koi to thrive. The size of the pond is also crucial, with a minimum capacity of 1,000 gallons.
Common Myths About Koi and Koi Ponds
Many people believe that koi fish are expensive, but most cost around £20. However, premium specimens can cost thousands. Another misconception is that koi only grow to match their pond size, when in fact, they will continue to grow if properly fed and maintained.
Essential Components of a Successful Koi Pond
A successful koi pond requires several essential components, including a proper biological filtration system, adequate depth, bottom drains, and water quality monitoring equipment. Regular water quality tests, such as PH, KH, Ammonia, and Nitrite, are crucial for maintaining a healthy environment.
| Component | Description | Importance |
|---|---|---|
| Biological Filtration System | Converts ammonia into nitrite and then nitrate | High |
| Bottom Drains | Removes debris and waste from the pond floor | High |
| Water Quality Monitoring | Regular testing of water parameters | Critical |
Planning Your Koi Pond Project
Planning your koi pond project is a crucial step that requires careful consideration of several factors. A well-planned koi pond not only enhances the aesthetic appeal of your garden but also ensures the health and well-being of your koi.
To start, you need to determine the ideal location and size for your pond. When choosing a location, consider factors such as sunlight exposure, proximity to trees, visibility from your home, and accessibility for maintenance. Ideally, your pond should receive 4-6 hours of direct sunlight daily.
Determining the Ideal Location and Size
The size of your pond will depend on how many koi you plan to keep. A general rule of thumb is to provide approximately 250-300 gallons of water per adult koi for optimal health. Consider the space available in your garden and how the pond’s size will impact its overall ecosystem.
- Assess the area where you plan to build the pond, ensuring it’s level and stable.
- Consider the visual impact and how the pond will be viewed from different angles.
- Ensure the location is accessible for regular maintenance.
Calculating Depth and Volume Requirements
The depth of your koi pond is crucial, especially in climates with cold winters. In the UK, a minimum depth of 3 feet is recommended, while deeper areas of 4-5 feet can be beneficial for overwintering koi. The volume of your pond will also affect the water quality and stability.

Creating a Detailed Design Plan
Once you have determined the location, size, and depth of your pond, it’s time to create a detailed design plan. This involves sketching multiple iterations, considering different shapes, and visualizing the pond’s layout using stakes and string on site.
Your design plan should also include all technical components such as filtration systems, bottom drains, and water returns. By taking the time to plan carefully, you’ll be able to create a beautiful and functional koi pond that enhances your garden for years to come.
Essential Tools and Materials for Build Your Own Garden Koi Pond
To build a thriving koi pond, it’s crucial to have the appropriate tools and materials. The construction of a koi pond is a significant project that requires careful planning and execution.

Construction Tools Checklist
You’ll need a variety of digging tools such as spades and shovels, possibly a mini excavator for larger ponds. Measuring tools like a tape measure, spirit levels, and a string line are also essential. Additionally, you’ll require cutting tools such as a PVC handsaw and a reciprocating saw.
Building Materials Overview
The building materials for your koi pond will vary depending on your chosen construction method. Typically, you’ll need liner materials like EPDM rubber, underlayment to protect the liner, and concrete or blocks for structural elements. You’ll also need materials for capping the pond edges.
Filtration and Plumbing Components
Filtration components are critical for a healthy koi pond. You’ll need a biological filter, mechanical filtration, a UV clarifier, and bottom drain assemblies. For plumbing, use high-quality PVC pressure pipe and various fittings, and consider aeration systems to ensure proper oxygen levels for your koi.
By having the right tools and materials, you’ll be well on your way to creating a beautiful and thriving koi pond in your garden.
Excavation and Foundation Work
The process of building a koi pond starts with excavation, a crucial step that lays the groundwork for the entire project. You need to carefully plan and execute this phase to ensure a stable foundation for your pond.
Marking Out and Digging the Pond Area
Begin by marking the pond outline on the ground using spray paint or string lines, ensuring you follow your design plan precisely. It’s essential to check for any underground utilities before digging. When digging, create a stepped profile with different depth zones, sloping the bottom toward the centre where your bottom drain will be located.

Preparing the Base and Installing Bottom Drains
Preparing the base involves compacting the soil thoroughly, adding a layer of sand or fine gravel, and ensuring the entire base is perfectly level to support the weight of water evenly. Installing bottom drains requires precise positioning at the lowest point of the pond, securing them on a concrete pad, and connecting them to the external filtration system with appropriate pipe work.
| Step | Description | Materials Needed |
|---|---|---|
| 1 | Marking out the pond area | Spray paint or string lines |
| 2 | Digging the pond | Backhoe or excavator |
| 3 | Preparing the base | Sand or fine gravel, compactor |
| 4 | Installing bottom drains | Bottom drain, concrete, pipe work |
Creating Proper Drainage and Levelling
Creating proper drainage and levelling is crucial for the longevity and health of your koi pond. Ensure that the area around the pond is graded to prevent water from accumulating near the edges. Use a laser level to achieve accurate levelling, and make sure the drain is positioned correctly to facilitate efficient waste removal.
By following these steps and ensuring that each stage of the excavation and foundation work is done correctly, you can create a stable and healthy environment for your koi.
Building the Pond Structure
The foundation of a successful koi pond lies in its structure, which must be carefully planned and executed. A well-built pond structure is essential for maintaining water quality, ensuring the health of your koi, and creating a visually appealing feature in your garden.
Constructing Walls
When it comes to building the walls of your koi pond, you have several options, including concrete, concrete blocks, and wooden frames. Concrete walls offer excellent durability and can be formed to any shape, but they require proper reinforcement with rebar and careful attention to curing times between pours. For example, using 2″x4″s and 2″x6″s to make forms for the wall cap can give it the appearance of thick slate on top of the wall.

Installing Liner and Protective Underlayment
Once the walls are constructed, the next step is to install a protective underlayment and liner. This involves laying a geotextile fabric to prevent punctures, followed by carefully positioning the EPDM rubber liner with sufficient overlap at the edges. Ensuring the liner is properly secured is crucial for withstanding water pressure and preventing leaks.
| Material | Purpose | Benefits |
|---|---|---|
| Geotextile Fabric | Protective Underlayment | Prevents punctures, durable |
| EPDM Rubber Liner | Waterproofing | Flexible, resistant to UV and chemicals |
Creating Different Depth Zones
Creating different depth zones within your pond not only adds visual interest but serves practical purposes. Shallow shelves (12-18 inches) are ideal for marginal plants, while mid-depth areas (2-3 feet) allow for fish movement. Deeper zones (3-5 feet) provide temperature stability and winter protection for your koi. By incorporating these varying depths, you can create a thriving ecosystem that supports a diverse range of aquatic life.
By following these steps and considering the construction methods and materials, you can build a sturdy and beautiful koi pond that will provide years of enjoyment.
Setting Up the Filtration System

The filtration system is the backbone of a thriving koi pond, requiring careful setup and maintenance. A well-designed system ensures optimal water quality, clarity, and the overall health of your koi.
Understanding Biological and Mechanical Filtration
Understanding the difference between biological and mechanical filtration is crucial for designing an effective filtration system. Biological filtration involves beneficial bacteria converting toxic ammonia into less harmful compounds, while mechanical filtration removes physical debris from the water. Both types are essential for maintaining a healthy pond environment.
Installing Pumps and Bottom Drains
Installing bottom drains connected to settlement chambers or pre-filters allows solid waste to be removed before water reaches the main filtration system, improving efficiency and reducing maintenance. Pumps should be sized appropriately for your pond volume, with the capacity to turn over the entire pond volume at least once every 2-3 hours for optimal filtration.
Setting Up UV Clarifiers and Skimmers
UV clarifiers help control algae and some pathogens by exposing water to ultraviolet light, while skimmers remove floating debris from the water surface. Both components contribute to overall water quality and clarity, ensuring a healthy environment for your koi.
When setting up your filtration system, it’s essential to follow the manufacturer’s instructions for each component, including the filter, pumps, and UV clarifiers. Proper plumbing and valve installation are also critical to ensure efficient operation and ease of maintenance.
Adding Finishing Touches
As you near the completion of your koi pond, it’s time to focus on the finishing touches that will elevate its appearance and functionality. These final elements will not only enhance the visual appeal of your pond but also contribute to a healthy environment for your koi.
Creating Decorative Edges and Surrounds
Creating decorative edges and surrounds is a crucial step in completing your koi pond. You can use natural stone capping, wooden decking, or concrete pavers to create a visually appealing border. Ensure that these elements are securely installed to prevent movement and provide safe access for viewing and maintenance. For example, using rocks around the pond can add a natural touch and help to prevent erosion.
- Choose materials that complement your garden’s style.
- Ensure the edges are securely installed to prevent accidents.
- Consider the mature size of plants when selecting species for around the pond.
Installing Water Features and Lighting
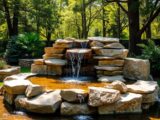
Installing water features such as fountains, cascades, or small waterfalls can significantly enhance the aesthetic appeal of your koi pond. These features not only add visual interest but also serve the practical purpose of aerating the water, which benefits both fish health and water quality. For instance, using a pot as an overflow style fountain, as described in the data, can be an innovative and effective solution. 
When installing water features, consider the overall design and ensure that they are proportionate to the size of your pond. Proper placement and maintenance of these features are crucial to their effectiveness and longevity.
Adding Plants Around (Not In) Your Koi Pond
When it comes to adding plants around your koi pond, it’s essential to choose species that won’t drop excessive leaves or debris into the water. Consider the mature size of the plants to prevent overcrowding over time. Unlike traditional garden ponds, it’s generally recommended to keep plants outside the main koi pond to prevent koi from uprooting or eating them, and to avoid compromising water quality with plant debris.
- Select plants that are suitable for the climate and soil conditions.
- Plant them in a way that creates a natural, harmonious look around the pond.
- Avoid overplanting, which can lead to excessive debris in the water.
By carefully considering these finishing touches, you can create a beautiful and thriving koi pond that becomes a focal point in your garden.
Introducing Koi to Your New Pond
With your pond complete, the moment has arrived to introduce the koi that will bring your water feature to life. This is a delicate process that requires patience and careful attention to water parameters to ensure the health and wellbeing of your fish.
Preparing the Water and Testing Quality
Before adding any koi, make sure your pond has been running for at least 2-3 weeks to allow the filtration system to begin establishing beneficial bacteria and to stabilise water parameters. Testing water quality is essential, with particular attention to ammonia (0 ppm), nitrite (0 ppm), nitrate (below 40 ppm), pH (7.0-8.6), and KH (carbonate hardness) levels.

Selecting Healthy Koi and Proper Introduction Techniques
When selecting koi, look for specimens with bright, clear eyes, undamaged fins, no visible parasites or injuries, and active swimming behaviour. Purchasing from reputable koi dealers is strongly recommended. The proper introduction technique involves floating the sealed transport bag in your pond for 15-20 minutes to equalise temperature, then gradually adding pond water to the bag over another 15-20 minutes before finally releasing the fish into their new home.
Feeding and Initial Care Guidelines
After introducing your koi, it’s crucial to monitor their health and adjust their diet accordingly. Start with high-quality koi food and avoid overfeeding, as this can lead to water quality issues. Regularly check the pond’s water temperature and adjust feeding amounts based on the koi’s activity level and the season.
Conclusion: Maintaining Your Garden Koi Pond
The completion of your koi pond is just the beginning; regular maintenance is vital to creating a thriving environment for your koi. To keep your fish healthy and your pond in good condition, you’ll need to perform routine tasks such as checking and cleaning the filter media, testing water parameters, and removing debris from the pond’s surface.
Seasonal changes also require adjustments in your maintenance routine. For instance, during spring, you’ll need to gradually increase feeding as water temperatures rise, while in winter, feeding should be reduced or stopped below 10°C. Additionally, ensuring the proper function of your drain and pump systems is crucial for maintaining water quality.
By staying on top of these tasks and being mindful of the changing needs of your pond throughout the year, you can enjoy a beautiful and healthy koi pond in your garden for years to come. Regular maintenance not only ensures the well-being of your koi but also enhances your garden’s aesthetic appeal.
FAQ
What is the ideal size for a koi pond?
The ideal size for a koi pond depends on several factors, including the number of koi you plan to keep, the available space in your garden, and your budget. A minimum size of 4.5 metres in length, 2.5 metres in width, and 1.2 metres in depth is recommended to provide a stable environment for your koi.
How deep should a koi pond be?
A koi pond should be at least 1.2 metres deep to allow your koi to survive the winter months. Deeper ponds also provide better water quality and reduce the risk of algae growth.
What type of filtration system is best for a koi pond?
A combination of biological and mechanical filtration is recommended for a koi pond. Biological filtration helps to break down waste products, while mechanical filtration removes suspended solids from the water.
How often should I test the water quality in my koi pond?
You should test the water quality in your koi pond at least once a week, or more frequently during periods of hot weather or after introducing new koi to the pond.
Can I use tap water to fill my koi pond?
Tap water can be used to fill a koi pond, but it’s essential to dechlorinate the water first using a water conditioner to remove chlorine and chloramines that can harm your koi.
How can I prevent algae growth in my koi pond?
To prevent algae growth, ensure your koi pond has adequate filtration, maintain good water circulation, and control the amount of nutrients entering the pond. You can also add plants that compete with algae for nutrients.
What is the recommended water temperature for koi?
Koi can tolerate a wide range of water temperatures, but the ideal temperature is between 15°C and 25°C. Avoid temperatures above 30°C, as this can lead to stress and disease in your koi.
How do I introduce new koi to my pond?
To introduce new koi to your pond, float the unopened bag containing the koi in the pond for 20-30 minutes to allow the water temperature to equalise. Then, release the koi into the pond, monitoring them closely for signs of stress.